Friday, December 30, 2011

10-minute fix and tutorial

Now, if you are like me, then before/after Christmas brings a need to organize.  For us, we go through toys before and after.  One of the big problems we have are STUFFED ANIMALS.....dum, dum, dummmmm.  They take up so much room and for many kids (like mine), they are rarely played with.  That said, we do not just throw away all of these, because some are sentimental.  There are grandparents that my children dont see very often and they like to send their grandchildren adorable stuffed animals to love. 
So...we went to every store and looked in almost every section and could not find one of those animal nets!  Anyway, I had some extra jersey knit lying around doing nothing and decided to make one.  It literally took me about 10 minutes and didnt cost me a penny.  You can even omit some of my steps.
You start with a triangle.  It does NOT have to be measured perfect by any means, because you cant tell at all when it is filled and the distance of each end changes things as well. 
My "net" is about 3 feet long on the front side that faces out.  You can make it however big or small you want.

After my triangle, I cut 3 strips of knit about 1 inch wide and 11 inches long. You can adjust the measurements if you prefer to have shorter straps. I then folded the strips in half and did a zigzag stitch down it. I mostly did this to make it look a little better and be a little more durable. This is one of the steps that you can omit. 
Next, I took the strips to each corner and folded the corner down like I was going to hem it.
Fold the corner once more....
and then move the strip back to the outside. Pin in place so you can stitch it together.
Sew two lines across the top and bottom of the hem. Folding it over and stitching it this way is also another way to make it a little more durable. :) Can't beat that with little monkeys running around. 
This is what you will then have at all three corners:
Now it's time to hang it up! I used these handy little guys that came out of my tool pouch.
I then put all the animals in it and decided to tie some ribbon, that I had a ton of, to the ends to make it look a little more girly since my knit was blue.  Now...I did not do any other hemming on this, because it was jersey knit.  If the fabric that you have on hand frays, you can choose to hem or not to hem.  A hem would be a great detail, but you can also argue that you arent going to be washing this every weekend so perhaps you may feel that there is no need to hem.   Either is awesome!  It would look adorable coordinated with their room. 

**update:  This has been up for over a year now, and has still held up.  I may make another one with cuter fabric, though.

A little outdoor decor

 Have you tried making outdoor paint for your kids yet?  We gave it a try not to long ago and it was a hit.  It was also nice that their dad could come home to a nice mural too.  I sort of wanted to freak him out.  ....not THAT is love.  :)
 We started on the ground, then I thought our garage door looked like a blank canvas for them.
 And on and on we went. The recipe came from Ohdeedoe.  If you would like step by step pics, she has some amazing ones.  The recipe is just:
2 Tablespoons Cornstarch
2 Tablespoons Water
5 Drops of Food Coloring
Do you think it is enough to scare Justin?  Well, it's not.  Justin knew there was no way I would let our kids permanently paint on our garage....."every party needs a pooper, that's why we invited you, Party Pooper."  Hopefully I'm not the only one that knows this song.  haha
Anyway, I did have some neighbors call me later that day (and the next) and tell me that they loved it.  As for clean up??  I just took a hose to it.  Even after sitting for a few days, the whole thing came off in about 20 seconds.  Happy painting!

Hubby's Birthday

Hubby turned 29 last month!  He is like many husbands in the fact that he is very hard to shop for.  He is EXTREMELY specific in the things that he wants and only wants things that he will use on a regular basis.  I can't say I blame him, though.  Unfortunately, there arent as many "budget friendly" options as I would like.  So I have a few things that I KNOW he would appreciate pinned on my pinboard dedicated to him HERE.
 These are the bacon roses I made for him and delivered to him at work.  They are on the board, but you can always just go HERE and get the instructions on how to make them.  They are very easy and many husbands LOVE their bacon.

Next up, we have dinner.  Now, I am not that great in the kitchen, but I must say that everything was soooo yummy.  We had tomato-basil soup, homemade mozzarella sticks (which look funky), and gourmet grilled cheese sandwiches.  Oh my, I have to make it again soon.  The soup recipe was wonderfully simple....my kind of recipe.  I found it HERE.
The grilled cheese sandwiches had two different cheeses and they were on Italian bread.  Which in my opinion, made all the difference.  I highly recommend this soup.  Mmmmm....

Go Bumblebees!!

Soccer was officially underway at our house for the first time this past fall season. Our little U5 team is.....The Bumblebees!  Hubby is the coach, so we are even a little extra involved and we love it.

Can you see hubby looking on in this pic? 
 I had her put her little pointer up, but one of the best parts about the games is that no one takes score.  Families take turns providing snacks and sometimes, our team offers to share with the other team.  They are so sweet!  We probably scored just as many goals for other teams as we did our own.  :)
 The beginning of the season was pretty rough.  My poor sweet boy had a cold towel on his head for most of the game.  
She even does a little prance when throwing the ball to the ref.
 I know, I know....mom can be a major distraction when she is clicking away.  I usually only take pics for a couple minutes and then I spend the rest of the time yelling. Our team almost always makes the most noise.
I must say that we had the best kids and parents on our team.  Everyone got into the games and pitched in whenever they could.  It was wonderful!  We are already looking forward to the Spring 2012 Season.  Go Bumblebees!!

Wednesday, September 14, 2011

Afterschool Snack

 When was the last time you made Ants on a Log?  :)  I must say that it has been a very long time for us, but it is something that you can let your kids make all by themselves (which is my favorite part).  Well, I did cut the celery up, though.


 Kelsey was napping when Sadie came home from school, but my sweet little momma's boy was wide awake!! 

Oh, I just can't get enough of that smile!

 Don't forget to add your ants!!


You really can't beat a healthy snack that your kids can have fun making.  Although, I have to be honest and say that without the enormous load of peanut butter....my kids hate celery.  And when Kelsey woke up, we still had a few left and all she did was eat the raisins and peanut butter.  Sadie later said, "I don't think I like the celery part."  Hey, I tried, right?

Saturday, September 10, 2011

Foam Shapes

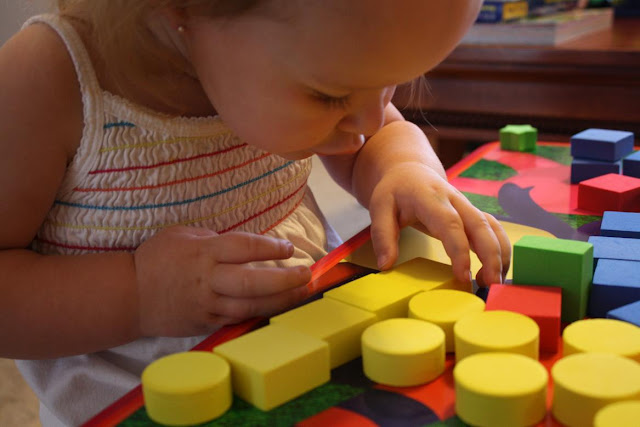
 I found these in the dollar spot section at Target today!!!  They were just what I was looking for (without really knowing that I wanted them, haha).  No, really!  I have so many fun little odds and ends for Sadie, but not really anything special for Kelsey.  Then these popped up!  ---all the exclamation points let people know how excited I am. 
 Don't they look wonderful?
With the help of my husbands empty protein container, we have a great way to store them.  Plus, Kelsey thought it was perfect....so you know it is.


 They fit in the tub so perfectly!  I had bought 4 bags.  She really does love them.

 The girls sat at their special little table and stayed there for quite some time.  I wanted to use them to teach Kelsey about different ways to group them.  Lately, I have really been thinking about toy purchases, and (since my kids have plenty of random toys) I wanted to get them toys that educate them as well as provide me with the opportunity to teach them.  Don't get me wrong, I am all for unstructured play and my favorite thing for my girls to do is just pretend, but like I said....I was hoping to have just a little more learning in the midst of it all.
 First, we grouped them by shape.  Kelsey was pretty stuck on those circles.

and of course we took the time to count each one.
 I encouraged Sadie to use the blocks too and help her sister find many uses for them.  Which later led to them building towers and a block wall to separate their space. 
 Next, we got all the yellow shapes together.  Kelsey wanted to line them up perfectly.

all that concentration is so adorable!
yes, that IS laundry that needs to be put away....tomorrow.  haha
The girls were sharing (another awesome thing to ATTEMPT to instill in a 2 and 4 year-old).
I think I will have to use these shapes with Sadie and play a pattern game!  I am very happy with my $4 purchase.  It was a cheap, but well thought out. 


I have to say that I am so grateful that I can stay home with my kids.  I truly cherish every moment with them, and there is NO place I would rather be.  I learn more from them, then they learn from me.  Every SAHM has rough days, but it is all worth it.